


.svg)


.svg)


Introduction
The Prometheus Alertmanager integration connects Rootly with your existing Prometheus alerting pipeline so teams can receive alerts in Rootly and trigger on-call paging directly from Alertmanager. This integration is a strong fit for teams already using Prometheus and Alertmanager for infrastructure monitoring who want Rootly to handle incident coordination and on-call response. With the Prometheus Alertmanager integration, you can:- Ingest Alertmanager firing alerts into Rootly as alerts
- Automatically resolve Rootly alerts when Alertmanager sends a resolved notification
- Page Rootly on-call targets directly from Alertmanager using webhook URLs or Prometheus rule annotations
- Use alert workflows to create incidents and automate follow-up actions
Before You Begin
Before setting up the integration, make sure you have:- A Rootly account with permission to manage integrations and alert sources
- Access to your Alertmanager configuration file (
alertmanager.yml) - The webhook URL and bearer token secret from the Rootly Alertmanager integration page
You can find your webhook URL and bearer token secret by navigating to Integrations > Prometheus Alertmanager > Configure in Rootly.
Installation
Open the Alertmanager integration in Rootly
Navigate to the integrations page in Rootly and select Prometheus Alertmanager. Copy the webhook URL and bearer token secret shown in the configuration modal.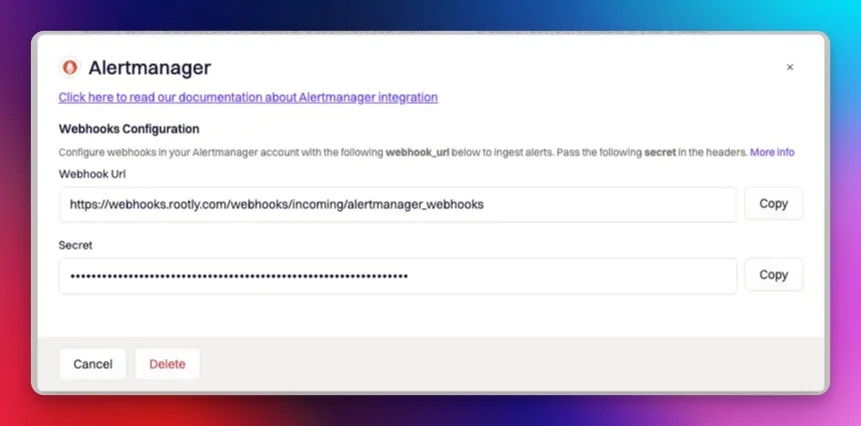
Configure your alertmanager.yml
Add a Rootly receiver to your Setting
alertmanager.yml configuration file. Set the url to the Rootly webhook URL and the credentials to your bearer token secret.send_resolved: true is required for Rootly to automatically resolve alerts when Alertmanager sends a resolved notification.Page Rootly On-Call
Alertmanager can page Rootly on-call targets directly. There are two ways to configure this.Via Receiver URL
Append a notification target to the webhook URL in youralertmanager.yml. This routes the alert to the specified Rootly resource for paging.
<resource_type> and <resource_id> with one of the following:
| Resource Type | Description |
|---|---|
User | A specific Rootly user |
Group | A Rootly team |
EscalationPolicy | A Rootly escalation policy |
Service | A Rootly service |
Via Prometheus Rule Annotations
If you use Prometheus alerting rules, you can set the notification target through annotations in yourprometheus.rules.yml file. This lets you define the paging target per rule rather than per receiver.
alerting_targets (an array) instead of notification_target:
type and id values follow the same options as the receiver URL approach above.
How Alerts Are Mapped
Rootly extracts the following fields from each Alertmanager alert:- Summary — taken from the alert’s
alertnamelabel, falling back tocommonLabels.alertname, thencommonLabels.description - Labels — all key-value pairs from
commonLabelsare attached as Rootly alert labels, making them available for routing, filtering, and display. Individual labels likeinstance,dc,job, andstatusare also extracted. - External ID — the
alertnamelabel, used to deduplicate and match resolve events - External URL — the
generatorURLfrom the alert, or theexternalURLfrom the webhook envelope
How Auto-Resolution Works
Whensend_resolved: true is set in your Alertmanager configuration, Alertmanager sends a resolved notification to Rootly when a firing alert returns to a normal state. Rootly uses the endsAt timestamp in the resolved payload to mark the corresponding alert as resolved.
Alerts are matched by their external identifier — if an alert fires and resolves multiple times, Rootly updates the existing alert rather than creating duplicates.
You can also explicitly set the alert status by including rootly_alert_status in the webhook payload. Valid values are open, triggered, and resolved.
Troubleshooting
Alerts are not appearing in Rootly
Alerts are not appearing in Rootly
Verify that the webhook URL in your
alertmanager.yml matches the one shown in your Rootly integration settings. Confirm that the bearer token secret is correctly set under credentials and that the Alertmanager receiver is being triggered by your routing rules.Alerts are not being resolved automatically
Alerts are not being resolved automatically
Confirm that
send_resolved: true is set in your webhook configuration. Without this, Alertmanager will not send resolved notifications to Rootly and alerts will remain open until manually resolved.On-call paging is not working via the receiver URL
On-call paging is not working via the receiver URL
Check that the
resource_type and resource_id in the notification target URL are correct. The resource ID can be found by editing the target resource in Rootly. Ensure the resource type is one of User, Group, EscalationPolicy, or Service.On-call paging is not working via rule annotations
On-call paging is not working via rule annotations
Confirm the
rootly annotation is valid JSON and that the type and id values match an existing Rootly resource. Invalid JSON or a missing resource will cause the notification target to be ignored.